Roasted Edamame
Roasted Edamame serves as a satisfying alternative to traditional potato chips or processed crackers. By transforming simple soybeans into a crunchy, flavorful treat, you create a snack that supports your health goals without sacrificing the savory experience you crave.
Whether you are looking for a quick afternoon pick-me-up or a protein-packed topping for your favorite salads, this preparation method makes the most of the humble legume. You will find that these pods are remarkably easy to prepare in your own kitchen using just a few pantry staples.
- Prep time: 15 minutes
- Cook time: 30 minutes
- Total time: 45 minutes
- Servings: 4
- Calories: 420 per serving
Ingredients
- 16 ounces shelled edamame, thawed and patted completely dry
- 2 tablespoons extra virgin olive oil
- 1 teaspoon sea salt
- 1/2 teaspoon garlic powder
- 1/2 teaspoon smoked paprika
- 1/4 teaspoon cayenne pepper (optional for heat)
Instructions
- Preheat your oven to 400°F (200°C) and line a large baking sheet with parchment paper.
- Ensure the edamame is thoroughly dried using paper towels, as excess moisture prevents the beans from crisping properly.
- In a large mixing bowl, toss the dried soybeans with olive oil until every bean is evenly coated.
- Add the sea salt, garlic powder, smoked paprika, and cayenne pepper to the bowl, tossing again to distribute the seasonings.
- Spread the seasoned beans in a single, even layer across the prepared baking sheet, ensuring they do not overlap.
- Bake for 25 to 30 minutes, shaking the pan halfway through to ensure even browning.
- Watch the oven closely during the final five minutes, looking for a deep golden brown color and a firm, brittle surface.
- Remove the tray from the oven and allow the beans to cool completely on the sheet; they will continue to crisp up as they reach room temperature.
Understanding the Nutritional Value
The primary component of this dish, Glycine max, is a nutritional powerhouse that offers significant benefits to your daily diet. These legumes are famous for their complete profile of essential amino acids, making them an excellent choice for those seeking plant-based protein sources.
Beyond the protein content, the fiber content found in these beans is substantial. Regular consumption can support digestive health while helping you feel full for longer periods throughout the day.
You will also appreciate that these beans are mineral-dense. They provide a reliable source of magnesium and iron, which are vital for energy metabolism and oxygen transport in the blood.
Preparation Techniques for Maximum Crunch
Achieving a truly crispy texture requires more than just high heat. The most common mistake home cooks make is failing to remove surface moisture from the frozen soybeans before seasoning.
If the beans are damp when they hit the oven, they will steam rather than roast. Use a clean kitchen towel to press them dry, or let them air-dry on a rack for ten minutes before adding the oil.
Uniformity matters when you are aiming for a consistent crunch. Try to keep the beans in a single layer on your baking sheet so that hot air can circulate around each individual soybean.
Flavor Variations and Customizations
While the classic combination of garlic powder and smoked paprika works perfectly, you can easily adapt the flavor profile to suit your mood. For a zesty twist, consider adding a teaspoon of lime zest or a dash of chili-lime seasoning after the roasting process is complete.
If you prefer something more earthy, try tossing the beans with dried rosemary or thyme immediately after they come out of the oven. The residual heat helps the herbs adhere to the oil on the bean surface.
For those who enjoy a touch of sweetness, a tiny drizzle of maple syrup combined with a pinch of cinnamon creates a surprising and delicious contrast. Experimenting with these variables allows you to keep your snack rotation exciting without abandoning your health-conscious habits.
Storage and Shelf Life
Proper storage is essential to maintain the quality of your roasted legumes. Once the beans have cooled entirely, transfer them to an airtight container or a glass jar.
They will remain at their peak crispness for about three to five days when kept in a cool, dry pantry. If you notice them softening after a day or two, you can quickly revive them by placing them back in a 350°F oven for five minutes.
Avoid storing them in the refrigerator, as the humidity can cause the texture to become chewy rather than crunchy. If you find yourself making large batches, you can keep the unroasted, seasoned beans in the freezer for up to a month before cooking.
The Science of Oven-Roasting
The process of roasting at high temperatures initiates the Maillard reaction, which is responsible for the complex flavors and browned appearance of the beans. This chemical interaction between amino acids and reducing sugars creates the nutty, savory notes that make these snacks so addictive.
When you roast these beans, you are effectively performing a form of rapid dehydration. By driving off the water content, you concentrate the natural flavors and create a shelf-stable structure.
This technique is a far healthier alternative to deep-frying, which can introduce unnecessary fats and destroy delicate nutrients. You can learn more about the health benefits of various legumes through the Harvard T.H. Chan School of Public Health guidelines on dietary variety.
Integrating Snacks into a Healthy Lifestyle
Incorporating protein-rich snacks into your daily routine helps prevent blood sugar spikes and mid-afternoon energy crashes. Because these beans are keto-friendly and low-carb, they fit into almost any modern dietary framework.
They serve as a perfect bridge between meals, providing enough sustenance to keep you focused until dinner time. Many people find that having a pre-portioned container of these roasted beans on hand prevents them from reaching for less nutritious, processed options.
Consider adding them to your meal prep routine on Sunday evenings. Having a batch ready to grab on your way out the door makes it significantly easier to stick to your wellness goals throughout the busy work week.
Common Equipment and Tools
You do not need specialized culinary equipment to master this dish. A standard, heavy-duty baking sheet is the most critical tool, as it provides the thermal mass needed for even browning.
Using parchment paper is highly recommended, as it prevents the beans from sticking to the surface and makes cleanup effortless. If you do not have parchment, a silicone baking mat works just as well and provides a reusable, eco-friendly option.
For those who prefer using an air fryer, the process is even faster. Simply set your device to 375°F and cook for 12 to 15 minutes, shaking the basket frequently.
Frequently Asked Questions
Can I use fresh edamame instead of frozen?
Yes, you can use fresh pods, but you must shell them first and then blanch them in boiling water for three minutes. Drain them thoroughly and pat them dry before proceeding with the roasting instructions.
Why are my beans still soft after roasting?
This usually happens because the beans were not dried properly before roasting or were crowded too closely on the pan. Ensure they are completely dry and in a single, non-overlapping layer to allow for proper moisture evaporation.
Can I make these in a microwave?
Microwaving is not recommended for this recipe. The high heat of an oven or air fryer is necessary to achieve the desired crispy texture that defines a successful roasted bean.
Are these snacks safe for children?
These are generally a healthy and safe snack for children, but use caution with younger kids who may find the hard, crunchy texture difficult to chew. Always supervise young children while they are eating.
How do I know if the beans are burnt?
If the beans turn black or emit a sharp, acrid smell, they have gone too far. A deep, dark brown is the limit; once you see the color darkening rapidly, remove them from the heat immediately.
Conclusion
Roasted Edamame represents the intersection of convenience, nutrition, and flavor. By mastering the simple steps of drying, seasoning, and roasting, you gain a versatile tool for your pantry that supports a balanced lifestyle.
These beans prove that healthy eating does not require complex techniques or expensive ingredients. Whether you are seeking a quick, protein-rich snack or a crunchy topping for your favorite meals, this recipe delivers consistent results. I encourage you to experiment with different spice blends to find your personal favorite, and I look forward to hearing how you customize your own batch of this delicious snack.
Roasted Edamame
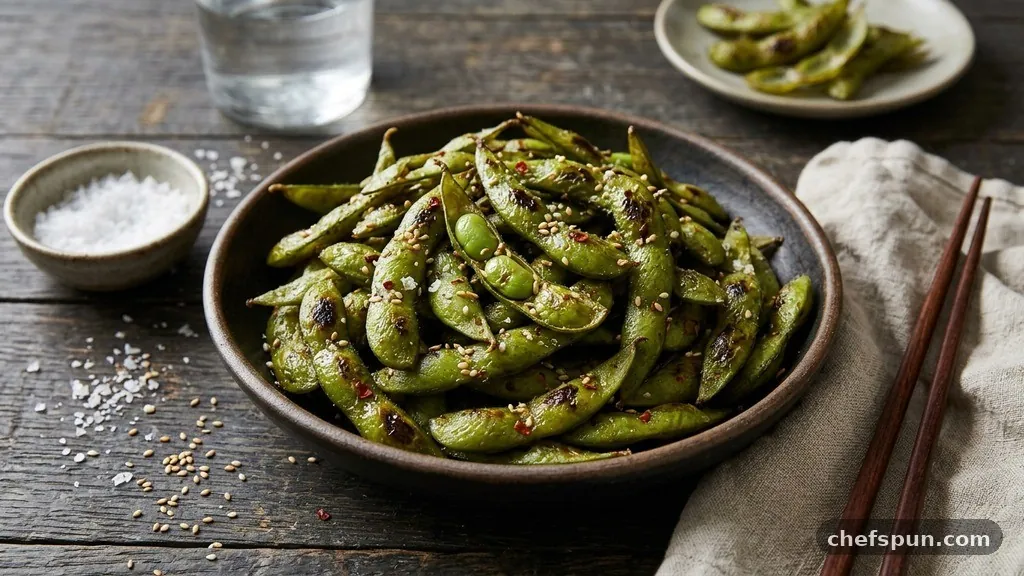
Roasted Edamame serves as a satisfying alternative to traditional potato chips or processed crackers. By transforming simple soybeans into a crunchy, flavorful treat, you create a snack that supports your health goals without sacrificing the savory experience you crave.
Ingredients
- 16 ounces shelled edamame , thawed and patted completely dry
- 2 tablespoons extra virgin olive oil
- 1 teaspoon sea salt
- 1/2 teaspoon garlic powder
- 1/2 teaspoon smoked paprika
- 1/4 teaspoon cayenne pepper (optional for heat)
Instructions
- Preheat your oven to 400°F (200°C) and line a large baking sheet with parchment paper .
- Ensure the edamame is thoroughly dried using paper towels, as excess moisture prevents the beans from crisping properly.
- In a large mixing bowl, toss the dried soybeans with olive oil until every bean is evenly coated.
- Add the sea salt, garlic powder, smoked paprika, and cayenne pepper to the bowl, tossing again to distribute the seasonings.
- Spread the seasoned beans in a single, even layer across the prepared baking sheet, ensuring they do not overlap.
- Bake for 25 to 30 minutes, shaking the pan halfway through to ensure even browning.
- Watch the oven closely during the final five minutes, looking for a deep golden brown color and a firm, brittle surface.
- Remove the tray from the oven and allow the beans to cool completely on the sheet; they will continue to crisp up as they reach room temperature.
Similar Posts
Vegan Christmas Cookies
Making a batch of homemade treats during the holidays brings a unique warmth to any kitchen. These plant-based delights capture the classic spirit of the season without requiring dairy or eggs. You will find that these recipes offer the same rich, buttery textures and festive flavors that define traditional holiday baking. Whether you are hosting…
Meringue Ghosts
Creating delightful Meringue Ghosts is a fantastic way to bring some seasonal charm into your kitchen. These light, airy treats are essentially crisp, sweetened egg white clouds that melt in your mouth, making them a popular choice for festive gatherings. By whipping simple staples into a stable foam, you can pipe adorable shapes that look…
Easy Halloween Desserts
Finding the perfect easy Halloween desserts can turn a standard evening into a festive celebration without requiring hours in the kitchen. Whether you are hosting a party for friends or putting together a surprise for your kids, these simple recipes focus on high-impact visuals with minimal effort. You do not need professional baking skills to…
Scary Halloween Monsters Bites
Creating delicious Scary Halloween Monsters Bites is a fantastic way to bring a bit of frightful fun to your holiday table without spending hours in the kitchen. These themed snacks combine the flaky texture of buttery dough with sweet or savory fillings, making them a hit with both kids and adults at any festive gathering….
Healthy Air Popped Popcorn
Choosing healthy air popped popcorn provides a simple way to enjoy a classic snack without the heavy fats found in theater-style versions. By relying on hot air rather than oil, you maintain the natural integrity of the grain while keeping calories low. This method creates a light, crispy texture that serves as the perfect canvas…
Healthy Halloween Treats
Finding ways to celebrate the season without relying on processed sugars can transform your holiday experience. Healthy Halloween treats offer a wonderful opportunity to involve the whole family in the kitchen while keeping energy levels stable and spirits high. By focusing on whole foods and creative presentation, you can whip up snacks that are just…